He Loved Me Through It All…

Lovely poem about God’s Love by @JacquelineOby!

a cooking pot and twisted tales

God love 2

He loved me through it all
With every stumble, every fall
He simply made me stand tall
And loved me through it all

Unfailing, whenever I call
He became my all in all
Even in sorrow of my own fault
Still he loved me through it all

Though heaven and earth
May pass away
His promise to love I know for sure
That since he has called me his beloved
He will love me through it all.

© Jacqueline Oby-Ikocha

There’s always room for more poetry about love — and @vijayasundaram2015‘s prompt, Beloved, invites you to take a fresh stab at a timeless topic.

”Thank you Vijaya” 🙂

View original post

5 Ways to Spice Up your Comments by …

Retrieved July 31, 2015

Retrieved July 31, 2015

HTML! …. 😮

Please, don’t go away. Just wait a minute!

I know that not all people like working with HTML codes. Maybe it is like a headache for them, isn’t it? Actually, I don’t agree. They are small codes, but they can make a big difference, believe me 🙂

Let’s try out some of them!

1. Make it BOLD to emphasize it:

If you want to attract the attention to something, the first thing that comes to your mind is to make it bold. Is it right? This is very easy when using HTML. Just write the following code and you will see:

 <strong>Need your Help!</strong>

2. Change the FONT SIZE of your text:

You can also emphasize your words by making the font size bigger. I’m sure this technique will help you to catch your readers’ eyes so quickly. First, you have to decide on which size you would like to use (e.g., Header 1, Header 2, Header 3 … etc). Say, you want to use “Header 1.” Let’s do it by HTML:

 <h1>Thank You!</h1> 

3. Quote to be more focused:

Quoting is a great way to be more focused and specific when responding to someone’s post or comment. To do so using HTML, you are going to put the quoted text between “blockquote” tag. Let’s see how to do it:

<blockquote>PUT THE TEXT HERE</blockquote> 

Here is an example:

Quote

4. What about LISTING?

Sometimes, we need to organize our ideas using a list. HTML enables us to do so easily using the following code:

Numbered list:

 <ol><li>First, go to your dashborad.</li> 
 <li>Second, head to your Widgets and drag Image.</li> 
 <;i>Third, paste the url of your image and hit save.</li></ol>

Bulleted list:

 <ul><li>First, go to your dashborad.</li> 
 <li>Second, head to your Widgets and drag Image.</li> 
 <li>Third, paste the url of your image and hit save.</li></ul>

5. Visualize it!

When some friends ask me about how to use or how to do something, creating a tutorial is my first choice as it helps them to see what to do. I always use Snagit tool to capture my screen, then I add my directions and save it as a picture. The next step is to upload that image to my blog to have a link. To insert it in my comment, I write the following code:

 <img src="PUT THE LINK OF YOUR IMAGE HERE!"> 

Here is an example:

Screenshot 2

I just choose these small codes to start with.
Now, pick up one and try it out in the comments box below!
Just to see!
😉

Resource:

  • The bold and quote techniques are based on a great tip shared by the WordPress.com team
  • All the other ways are the result of my play with the “HTML” editor.

Blogging 101 in a post!

Blogging U.I have just finished it. Blogging 101 is a 3-week course offered by the Blogging University with the help of the WordPress.com team. It started on July 6 and came to the end on July 24, 2015.

Zero to Hero is the name of this course. According to the course team, “It takes you from “Blog?” to “Blog!” Every weekday, you’ll get a new assignment to help you publish a post, customize your blog, or engage with the community. You’ll walk away with a stronger focus for your blog, several published posts and a handful of drafts, a theme that reflects your personality, a small (but growing!) audience, a grasp of blogging etiquette — and a bunch of new friends.”

Each week, we have 5 assignments to accomplish + ideas for the weekend

Week One

Day One: Introduce Yourself to the World
Day Two: Take Control of your Title and Tagline
Day Three: Say Hello to the Neighbors
Day Four: Identify your Audience
Day Five: Love your Theme
Weekend: Week One Ideas

Week Two

Day Six: Make an Irresistible “About” Page
Day Seven: Keep Personalizing
Day Eight: Be a Good Neighbor
Day Nine: Be Inspired by the Neighbors
Day Ten: Build  Better Blogroll
Weekend: Week Two Ideas

Week Three

Day Eleven: Make a Prompt Personal
Day Twelve: Increase your Commenting Confidence
Day Thirteen: Try (Another) Blog Event
Day Fourteen: Extend your Brand
Day Fifteen: Create a Feature
Weekend: Week Three Ideas + a final suggestion

During these THREE weeks, I have learned THREE big things:

  1. How to make my blog my own through various ways of personalization.
  2. How to attract my audience through posting great, consistent content.
  3. How to build a community through the commenting feature.

Let’s begin with the form:

I already have many blogs on WordPress.com. Before this course, I didn’t think about how much the form of my blogs can impact my readers. All what I always do is to click “New Post” and start writing, then publishing and that is all. But now I can add my own unique touches. Choosing a suitable title and tagline, selecting a comfortable theme that goes with the aim behind my blog, making a new header that attracts my readers to come back, publishing an irresistible “About” page that gives my readers an idea of who I am  and allows my voice to be heard, creating a blavatar that is the blog icon to build my brand, and changing my widgets’ titles to reflect the personality of my blog are among many things that I can do. Even the text widget, I can make it creative and colorful by displaying a combination of text, links, images, and HTML. Adding an elevator pitch – a quick summary of what my blog is about – is another feature that can help my visitors decide to stay and keep reading and commenting.

Just check out my blog and see how it looks like:

  • What about my blog blavatar? That red smiling apple next to the url!
  • Do you love my “Intro” widget at the top? Text, Images, Links, Icons …!
  • What do you think of my blog’s elevator pitch? Short and straight!
  • Have you noticed the new titles of my widgets? Colorful and interesting!
  • Would you please visit my “About” page? I visualized myself, instead.
  • … look around and see more! 😉

What about the content?

It is not just the form that we have learned about, but the content as well. During this course, we were exposed to many opportunities to write and post. Among them were:

  1. Finding suitable writing prompts and responding to them: According to the team, “Writing prompts can be a blogger’s best friend: when inspiration is low and fresh ideas few, responding to someone else’s question can do get you out of a slump.” Really, I enjoyed this assignment so much. You just search for a prompt that suits your interests and start writing and sharing your creativity with others. To try this out, check all the prompts here. Definitely, you will never stop blogging simply because you always have a jar to choose from.
  2. Trying other blog events: These events and challenges can be a great way for inspiration and motivation. They are hosted by other bloggers for free and all you have to do is to participate and enjoy writing. Take a look through the Community Event Listings and you will find a lot of blopportunities that can suit your interests. Kindly use the drop-down menus to sort by type or frequency of the event. It is like a lifelong experience that never ends. Once you finish one, you will pursue others to show off sometimes, finding  the writer in you, or just sharing with others in another time.
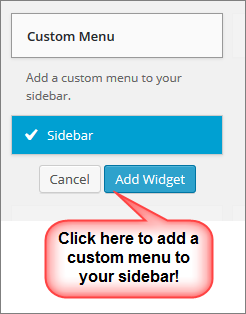
  3. Creating a regular posting feature: It gives your blog a hook and helps your writing stay sustainable. Just imagine you are posting every Friday about a certain topic. Your readers will wait for that with a full excitement and eagerness. You can tell your readers about this feature by creating a custom image widget and dragging it to your sidebar. It will attract their attention and keep them dropping by and reading or commenting. Remember, you are going for consistency, not frequency. This will encourage bloggers to post regularly improving their writing skills with an emphasis on quality not quantity. Here are some examples suggested by WordPress.com team. You can pick one and get started: A weekly photo post, or even better a weekly photo gallery post, a monthly Q & A with one of your blogging buddies, a Music Monday featuring the song that rocked your weekend, or a Flavor Friday dedicated to the recipe you experimented with over the previous week.

Do you remember No.3?

It is building a community through the commenting and following features. During this course, we completed 4 assignments about how to get connected to other bloggers, saying hello, following their blogs,  leaving comments, getting inspired and building new ideas based on these comments. As my new friend @jacqueline always says, sharing ideas with others is a great way to engage in this fabulous blogland or blogosphere. By communicating with them, you can learn new things, get a help, or a feedback, construct a new knowledge, and also find another eye to see how you are doing. Reading others’ blogs helps me to discover things from different perspectives and let me see how others think. I don’t talk about the ideas only, but how they use their blogs to improve themselves, marketing their products, sharing their projects, etc. In short, it is a two-way communication through which we can take and give; something from you and something from me ….

Last but not least, I just want to thank the Blogging University and all the WordPress.com team for giving me this opportunity to make my blog my own and unleash my creativity.

If you are also interested in blogging using WordPress.com platform, you can register NOW for the next offering from August 3 – 21, 2015

register-today

Wish you a happy journey of blogging!
🙂

Featured Blog by Tom Kuhlmann

I spent the whole day personalizing my blog by modifying, adding, deleting, or creating custom widgets. As usual, I got bored, so, I decided to search for other blogs to check out the form not content this time. I just wanted to see how other bloggers add their personality to their sites and which features they used to attract their readers.

The Rapid E-Learning Blog-2The Rapid E-Learning Blog
by Tom Kuhlmann caught my whole attention. The layout of his blog is comfortable to the eyes and it is so easy to navigate and browse its stuff. Really, it is highly recommended because:

  • This guy shares so great tips, tricks, free resources and many opportunities for e-learning success.

Viewing his about page, he seems conducting community-based e-learning face-to-face workshops and events providing practical tips, inspirational examples, free downloads, and expert advice. In addition, I found many golden chances for self-learning and all that for free. Here are two of them:

Participate in the weekly e-learning challenges to sharpen your skills

Participate in the weekly e-learning challenges to sharpen your skills

Getting Started? This e-learning 101 series and the free e-books will help

Getting Started? This e-learning 101 series and the free e-books will help

I do many things these days …
I will go back there to start off another e-dventure once I have some time.
🙂

Register Now: “The best blogging advice I ever recieved”

Dear my readers,

For this FRIDAY:

Retrieved on July 24, 2015

I invite you all to an on-demand webinar about “Blogging 101.”

You’ll learn:
  • How blogging has come a long way since the early days and evolved into a powerful business-building strategy
  • Why a well-managed blog is key to building personal rapport with clients and prospects
  • How blogging helps boost your search engine optimization (SEO)
  • How to build and manage a powerful blog … and start building those relationships that can lead to sales

When:
Monday July 13, 2015 at 1:00 PM CDT till
Friday July 31, 2015 at 11:55 PM CDT

Where:
This is an online event.

How:
Click here to Register

Then, you will receive an e-mail including a link to the on-demand webinar + a password that enables you to watch it on Vimeo.

Resource:

Check it out: My Friday’s Post

Day Fifteen’s task during the “#Blogging101” course is to: Develop a regular feature for your blog.

AFriday's Post_icons mentioned by Michelle W. and the WordPress.com team,Creating a regular feature means my readers have something specific to wait for at regular intervals, and this in turn gives my blog a hook.” Posting regularly on my blog is not an easy job as I am a busy teacher with heavy schedule plus working on my PhD that takes a lot of my time, in addition to participating in many projects with my students, and online opportunities, e,g, attending webinars, online conferences, online courses, and more. Since it is not frequency, but consistency, I decided to do it WEEKLY on FRIDAYS about not specific things. I will make it a little bit open. I can post an announcement about an online event that my readers can take part in. Sharing with them personal experiences, successful practices while teaching, touching moments with my students, new lesson plans, or tutorials are among many ideas I think of.

But, I will vary my style of writing and the topics provided each week; I mean one for a teaching event, another for a piece of advice telling them how to learn something new, and maybe a week for sharing a photo with a message and invite my readers to talk about it or write a collaborative story together.

You know my blog is about sharing various learning e-dventures that I don’t expect when and where I start them off, so I will make my Fridays’ Posts unpredictable, too.

Don’t forget to check out my Friday’s post today. Stay tuned! 🙂

Going further with my brand …

Smiling Tips
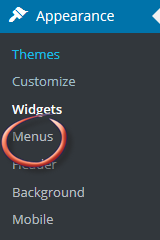
In addition to the blavatar that I created today, I kept trying other things to build my brand. One of them was creating another menu in which I added links to some helpful tips shared during this course “#Blogging101”. Then, I went to my blog widgets and added a custom menu. To make this section more attractive, I decided to make a custom image widget and put it above the menu. I also used Microsoft PowerPoint program to create this image using shapes, fonts, colors, and some other icons.

Here is how I did this task:

Step 1:
Go to your Dashboard – Appearance – Menus and create a new one.

Menu 1

Menu 2

Menu 3

Click “Custom Links” to add the URLs of your recommended sites.
You can add as many links as you can.

Menu 4

Menu 5

Step 2:
Go to your Dashboard – Appearance – Widgets, and drag a Custom Menu to your sidebar.

Menu 6

Menu 7

I hope this would be helpful!
🙂

Make it with Unsplash for FREE

Hello my readers, Black photo iconDuring week #3 of the “#blogging101” course, Michelle W. shared Unsplash; a very great site including lots of FREE images. According to its team, “All photos published on Unsplash are licensed under Creative Commons Zero which means you can copy, modify, distribute and use the photos for free, including commercial purposes, without asking for any permission.”

I just wanted to share it with you all. The images are of a high resolution taking from so creative angles. One can use it adding his or her touches with the help of photo editors like PicMonkey.

For inspiration, check out this link. You will find lots of creative ideas. Please, enjoy! 🙂

As a teacher, I will download some catchy images with clear messages and use them as a warm-up or an ice-breaking activity with my students. Just to refresh their schemata and bring life into my classes.

Here is an example:

I ask them to look at the images below, and then tell me what comes to their minds answering the questions I provide them.

What is behind the green door?

Retrieved on July 23, 2015

What is this boy waiting for?

Retrieved on July 23, 2015

How can you help this family?

I just prepare myself for the next school year! I have to fill my bag with so many creative ideas to reach my students’ expectations. 🙂

Getting a step forward with my brand …

Day Fourteen’s task during the “#blogging101” course is to:
Extend your brand with one of the following: a custom site icon, a custom image widget, or a fan page.

Brand rubber stamp. Part of a series of business concepts.

Retrieved on July 23, 2015

I just want to thank Blogging U. for letting me know about “branding” and how to extend it through a variety of ways. First,  I love the idea of having my own site icon. It is also called Blavatar; a term that combines both Blog and Avatar. This is simply because “It is not just a logo, but it is a guarantee. When readers see something associated with my brand, they know what to expect.”

The instructions to upload this blog icon are so easy-to-follow. To save your time, here is a tutorial created by WordPress.com team. You can do it in a minute if you have your own icon already made.

For me, I spent the whole morning working on that blavatar. After trying out many tools to create icons, I decided to use Microsoft PowerPoint program as it is clean and user-friendly. I just played with the shapes, fonts, colors, …etc. And, I came up with 4 icons. Actually, I need your help to choose the best one for my blog.

Which one

Why letter e …?

Since I talk about my e-dventures as a teacher and other e-things that I learn and share with others, I select the letter ‘e” adding my human touch; I mean my big smile.

Please, vote for the one you like the most:

Thanks for voting and helping me!
🙂

A new e-dventure, not for me …

Day Thirteen’s task of the “#blogging101” course is to:
Pick a blogging event from the Community Event Listings, and participate in the next round.

It isn’t fun anymore! Yes, the title of my blog says, “… nonstop …”, but I frankly got bored. I just love trying new different things and activities to promote my creativity. It is not just blogging! Maybe I come back to reflect on my experiences once or twice a week. This doesn’t mean I don’t like to blog. I just want to take some rest …..

For this task, I checked out the event listings and took some time browsing and reading about the available opportunities. Then, I found something that I didn’t expect.There was an event that suits my students. Actually, it would be a great chance for them to improve their writing skills and get their voices heard. Here is something about it:

Teens tell their storyTitle: Teens Tell Their Story
Event Organizers: Sherinaspeaks
and A Little Daydreamer
When: Starts on July 22nd, 2015
Goal:
“It is a weekly prompts-based project created by two teen bloggers with a goal of creating an online space for teenagers to share their thoughts on issues that affect them.”
For more details, click here.

Last semester, I involved my students in a blogging experience in which they wrote and shared their stories in groups and individually for 2 months. It was a great success, but I made it private so students can feel more secure while posting and commenting to each other. This event is a little bit different as students will write for an authentic open audience. It is not an easy job, I know because this needs a more thorough focus on both content and form.

Let’s see if they can take part in this new e-dventure!
🙂