 In addition to the blavatar that I created today, I kept trying other things to build my brand. One of them was creating another menu in which I added links to some helpful tips shared during this course “#Blogging101”. Then, I went to my blog widgets and added a custom menu. To make this section more attractive, I decided to make a custom image widget and put it above the menu. I also used Microsoft PowerPoint program to create this image using shapes, fonts, colors, and some other icons.
Here is how I did this task:
Step 1:
Go to your Dashboard – Appearance – Menus and create a new one.
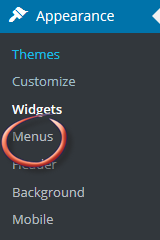


Click “Custom Links” to add the URLs of your recommended sites.
You can add as many links as you can.


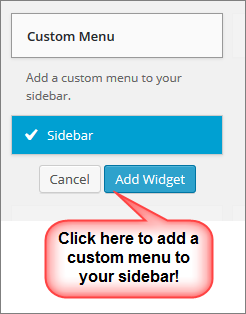
Step 2:
Go to your Dashboard – Appearance – Widgets, and drag a Custom Menu to your sidebar.

I hope this would be helpful!
🙂

Your blog is coming together very nicely. Well done and thanks for sharing the tutorial.
LikeLiked by 1 person
Dear my lovely friend Jacqueline,
Always encourage me. Your so sweet words mean a lot to me. I hope the tutorial would helpful for you!
🙂
LikeLiked by 1 person
Every knowledge is useful. Thanks once again.
LikeLiked by 1 person
Yes! Awesome!
LikeLiked by 1 person
Thanks for your compliments.
I appreciate your feedback! 🙂
LikeLiked by 1 person
Wow, your site looks really great. Thank you for the easy tutorial. When I have a minute I may tinker with things on my blog again. I made a new blavatar and added it as my logo, but that’s as far as I have been willing to go!
LikeLike
Dear whereshappy,
You are welcome my dear and thanks so much for dropping by. Have you changed the color of your blog background? I love your new look. Your blavatar and logo also reflect your title. You are doing a great job.
Have you tried to use images with clean backgrounds? for me, I use http://www.lunapic.com/editor/ to change them into transparent.
I downloaded your blavatar and make it transparent for you. Here it is:
Have a happy weekend!
🙂
LikeLiked by 1 person
Wow, thank you so much! I had never heard of that site before. You have been most helpful!!!
LikeLiked by 1 person
You are most welcome, my dear friend. In case you would like to do it yourself, just upload you photo, hover over the”Edit” list and click “Transparent” , then hit any while or colorful background to turn it into transparent. To save it, right click the image and choose “Save image as …”
And that is it 🙂
LikeLiked by 1 person
LunaPic (http://www191.lunapic.com/) is a fabulous photo editor where you can play with many features that you don’t expect to find in any other tools for free. It is worth a try! 🙂
LikeLike
I am impressed. I’ll see if I can figure this out and use it. Thanks for the info.
LikeLiked by 1 person
Dear amanpan,
Thanks so much for visiting my blog. It is worth a try! If you need any help, please let me know 🙂
LikeLike
Will do. Thank you.
LikeLiked by 1 person